Monday, April 29, 2013

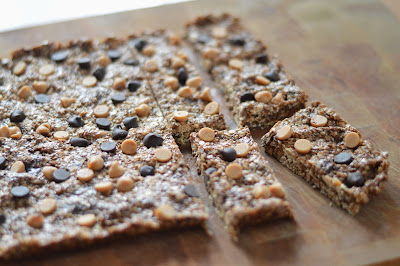
Double Chocolate Peanut Butter Granola Bars

Loaded with chocolate chips and peanut butter chips, these granola bars are one of the easiest snacks you can whip up.  So tasty and will give your kids protein from the peanut butter and tons of energy.  No sugar added.  A fantastic after school snack that will take you less than 10 minutes to prepare.  


Double Chocolate Peanut Butter Granola Bars

1/2 cup semi-sweet chocolate chips plus 1 tablespoon, divided
1/2 cup reduced fat peanut butter, divided 
1/4 cup fat free milk
2 cups oats
1/4 cup peanut butter chips plus 1 tablespoon
1/4 cup honey
1 tablespoon vanilla extract

In a microwave safe bowl, combine 1/4 cup semi-sweet chocolate chips, 1/4 cup peanut butter and the milk. Microwave for 30 seconds and stir until melted (if necessary, put in for another 10 seconds).  Stir in the remaining 1/4 cup of peanut butter, 1/4 cup of chocolate chips, oats, 1/4 cup peanut butter chips, honey and vanilla extract.  Set aside.

Spray a 8 x 8-inch pan with non-stick cooking spray, line with wax paper and spray the paper.  Pour the granola mixture in the pan and with moistened fingers, press into bottom of the pan.  Sprinkle the remaining 1 tablespoon each of the chocolate chips and peanut butter chips and press. Place in the freezer to firm up for about 10 minutes, flip the pan over and peel off the wax paper. Cut into squares or bars (I got about 15 bars out of mine).  Store in the fridge.  

Print Friendly and PDF

Monday, April 22, 2013

Chocolate Cherry Cupcakes

I am so glad these cupcakes turned out as cute as I envisioned them!  The cake part is the exact recipe for my Chocolate Cherry Cake, but I had to use a different type of icing because I couldn't pour the icing over these cupcakes like the original cake recipe calls for.  I remembered that I saw Ina Garten do a ganache icing that she just dipped the top of the cupcakes in.  And how easy, right?  No taking the time to spread icing on each cupcake.  Although I'm quite certain that Ina didn't use store brand semi-sweet chocolate chips for her icing, these turned out so good.  


How cute are they??  How perfect for a birthday party.  Our Chocolate Cherry Cake is an absolute must for any birthday in our family and I know that these would be such a fun surprise for anyone expecting a regular cake.  


Makes 18 cupcakes

Chocolate Cherry Cupcakes

1 box chocolate fudge cake mix
1 can cherry pie filling 
1 teaspoon almond extract
2 eggs, slightly beaten 

Icing
1/2 cup half & half
1 1/2 cups semi-sweet chocolate chips
18 maraschino cherries 

Make the cupcakes:  Preheat oven to 350 degrees and fill a 12-cup and 6-cup muffin pan with cupcake liners.  Combine the cake mix, pie filling, almond extract and eggs by hand and fill each cupcake liner about 3/4 of the way full.  Bake for 20-25 minutes until the cupcakes are puffed and a toothpick inserted into the center of one comes out clean.  Let cool before icing. 

Make the icing:  cook the half & half and chocolate chips in the top of a double boiler or heat safe bowl over simmering water.  Stir until smooth.  Dip the tops of the cooled cupcakes into the ganache and top with a maraschino cherry. 

(Source:  icing adapted from Ina Garten)

Print Friendly and PDF

Monday, April 15, 2013

Bruschetta Pasta

It's getting to be that time of year again...weather is getting warmer, I have basil growing in my backyard and tomatoes are more readily available.  All this combined made me really hungry for Bruschetta - chopped tomatoes with basil, olive oil and balsamic vinegar - and I thought instead of just making that served with crostini, I could just toss it with some pasta for a quick no-cook sauce.  It was excellent!  So great for a hot summer night when you don't feel like slaving over a hot stove (except to make the pasta of course).  I also included the recipe for the crostinis (little toasts) because I served them with our pasta.  

Serves 4-6

Bruschetta Pasta

1 pound thin spaghetti 
6 plum tomatoes, chopped and seeded
2 teaspoons minced garlic
1 tablespoon olive oil
1 tablespoon balsamic vinegar
6-8 basil leaves, chopped
sea salt and black pepper to taste
freshly grated Parmesan cheese (optional)

Crostini
1 baguette of French bread
1/4 cup olive oil
1 clove garlic

Prepare pasta according to directions.  Follow the next steps while the pasta is cooking.  

Preheat oven to 450 degrees.  Slice the baguette in 1/2 inch slices and arrange on a 9 x 13-inch baking sheet.  Using a pastry brush, brush a small amount of olive oil on each slice.  Toast for 5-6 minutes until they start to turn a golden brown.  Once removed from the oven, rub a little bit of the garlic clove onto each piece of toast. 

Chop and seed tomatoes while bread is toasting.  In a medium bowl, toss with the olive oil, balsamic vinegar and basil leaves.  Season with salt and pepper.  Set aside.  When the pasta is done, drain and return to the pot.  Toss with the tomato mixture and top with Parmesan cheese (if using).

Print Friendly and PDF

Friday, April 12, 2013

Easy Peasy Egg Salad

Egg salad is perfect for lunch but this is such a great recipe for a quick weeknight dinner when you have everybody running every which way (games, gym, school events, etc).  It keeps for a couple of days so it's perfect to make on a Sunday night and have it for lunch and/or dinner a couple of times.  I buy my eggs in bulk (no seriously, we go through eggs like they're going out of style) so I always have plenty on hand to make this. 


Perfect paired with a piece of toasted white or wheat bread and a leaf of Romaine lettuce.  Serve with chips for a quick lunch or I made my Sweet and Spicy Sweet Potato Fries for dinner one night.    

Makes 4-6 sandwiches

Easy Peasy Egg Salad

1 dozen eggs
1/2 cup mayonnaise
1 teaspoon yellow mustard
2 tablespoons sugar
2-3 tablespoons apple cider vinegar
salt and pepper

Place eggs in a large pot and fill with water so they are covered about an inch.  Place on the stove top on high until the water starts to boil.  Remove the pot from the heat and cover with a lid for 12 minutes (PERFECT hard boiled eggs every time!).  After the 12 minutes is up, drain the water, peel the eggs, chop and place in a large bowl.  

To make the dressing - in a small bowl, whisk the mayo, mustard, sugar and apple cider vinegar until combined.  At this point, I always taste it to see if it needs more vinegar (we like ours a little tangy).  Pour the sauce over the hard boiled eggs, salt and pepper to taste and stir gently.  Serve egg salad on toasted white or wheat bread.  

Print Friendly and PDF

Thursday, April 4, 2013

Banana Pudding Poke Cake

Every year for my husband's birthday I make him a banana cream pie, his favorite.  This year I stuck to the theme but made a cake instead of a pie...a Banana Pudding Poke cake!  Yum, yum, yum!!  It was SO good.  And easy.  I love easy...


Layers of yellow cake and banana pudding are topped with sliced bananas...


Then Cool Whip and crushed Nilla wafers!!  Incredibly easy and you entire family will flip over this.  


Banana Pudding Poke Cake

1 box of yellow cake mix and all the ingredients needed to make cake
2 boxes (3.4 oz each) banana instant pudding mix
4 cups milk
2 bananas, sliced
1 tub (8 oz) Cool Whip, thawed
1 box of Nilla wafers, cookies crushed

Prepare the cake according to the directions for a 9 x 13-inch pan and let cool slightly when done.  Using the handle of a wooden spoon, start poking holes in the cake.  You can poke holes all the way down to the bottom of the cake.  

Whisk together the instant pudding mix and milk until all the lumps are gone.  Let the pudding set for about 2 minutes until it is just slightly thickened, but still easily pourable.  Pour the pudding all over the cake and spread with the back of spoon to ensure that it gets in all the holes you poked!  Put the cake and pudding into the fridge until it completely sets.  Add the sliced bananas on top of the pudding.  Spread the thawed Cool Whip on top of the bananas, followed by the crushed Nilla wafers.  Serve chilled and store in the fridge.   

(Source:  Adapted from The Country Cook)

Print Friendly and PDF

FREE eCookbook!

Search

My photo
I'm a super busy mom of 3 and a Beachbody coach. Follow along as I try to find a balance between eating good food and keeping my family healthy and happy! We eat mostly clean with a few fun treats thrown in every once in awhile. Thanks for stopping by!

What I'm Pinning...

I'm on Instagram!


Rivit Media
PublisherMunchkin Land Designs
 
Designed by Munchkin Land Designs • Copyright 2012 • All Rights Reserved