Tuesday, October 12, 2010

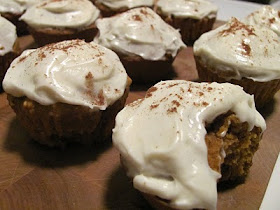
Mini Pumpkin Whoopie Pies

How cute are these? I love, love, love pumpkin! And cream cheese, what a combination. These also will make 6-9 large whoopie pies, but I just thought these were so adorable.

Makes 12-14

1 1/2 sticks unsalted butter, 1 stick melted, 1/2 stick room temp
1 cup packed light brown sugar
2 large eggs, room temp
1 cup canned pumpkin puree
1 1/2 teaspoons vanilla
1 teaspoon baking soda
1 teaspoon baking powder
3/4 teaspoon salt, plus 2 pinches
1 2/3 cups flour
4 ounces cream cheese
1 cup confectioners sugar

Preheat oven to 350 degrees. In a large bowl, whisk together the melted butter and brown sugar until combined. Add the eggs, pumpkin, 1 teaspoon vanilla, baking soda and powder, and salt. Whisk until combined. Fold in the flour. Using a tablespoon size ice cream scoop, drop mounds of batter onto baking sheet. Bake for 10-12 minutes or until springy to the touch. Cool completely.

Mix the cream cheese with the softened butter. Add the confectioners sugar and the remaining 2 pinches of salt and vanilla. Mix on low speed until blended, then medium-high speed until light and fluffy.

Spread the cream cheese frosting on the flat side of half of the cakes, then top each with another cake.

Wednesday, September 1, 2010

Risotto for Baby

As promised, this is a recipe that calls for Baby's stock, and it's definitely been a hit at our house. So very gourmet for your little one! Jules adored this Risotto cold because it clumped up and she could feed herself. I added asparagus puree and it was a fantastic mix-in... add any veggie your baby loves!

Makes about 2 cups

1/2 cup Arborio Rice
1 cup Baby's Stock
1 tsp extra-virgin olive oil or unsalted butter
2 tsp fresh herbs (your baby's preference - tarragon, dill, oregano, etc!)

Put rice, stock, and oil in a heavy bottom saucepan over medium-high heat and bring to a boil. Reduce heat to low and cook, stirring once, until liquid has been absorbed and rice is thick and creamy, about 15 minutes. Remove from heat, stir in herbs and cover for 10 minutes. Fluff rice with fork, stir in puree and serve lukewarm or cooled.


Cinnamon Sticky Buns

So by now you've noticed that most (ok, all) of my recipes are super simple and don't take a lot of time. Working full time and being a mom with an infant (and 3 dogs!) doesn't exactly give me a lot of time to dedicate to baking. That's why I even shocked myself with these sticky buns. They are definitely a lot more labor intensive than I normally have time for...seriously, look at these steps! I was quite impressed with myself. :)
P.S. I omitted the pecans, that is why they are not pictured in the filling.


Makes 3 batches of 9
For the dough:
2 tablespoons active dry yeast
1/3 cup warm water
1 cup milk, room temp
1 cup unsalted butter, room temp, cut into small pieces
3 large eggs
1/3 cup granulated sugar
2 teaspoons salt
1 teaspoon vanilla extract
6 cups all-purpose flour, plus more for work surface

For the topping:
1 cup unsalted butter
1/4 cup sugar
1 1/4 cups firmly packed light-brown sugar
1 cup light corn syrup

Filling:
1/3 cup packed light brown sugar
1/3 cup pecans, toasted, finely chopped

Preheat oven to 375 degrees. Stir together yeast and warm water in a small bowl, let stand until foamy, about 5 minutes.

Using an electric mixer, mix milk, butter, eggs, sugar, salt and vanilla on low speed until combined, about 2 minutes. Add yeast mixture, mix 1 minute. Add 4 cups of flour, mix until smooth.

Switch to dough hook, continue mixing and add more flour, 1/2 cup at a time until dough no longer sticks to the bowl. Beat on medium-high speed for about 10 minutes.

On a lightly floured surface, knead the dough until very smooth, about 2 minutes. Transfer to a large buttered bowl and cover with a clean kitchen towel. Let rise until doubled in size, about 1 hour.

Make topping: melt butter in a saucepan, stir in sugars and corn syrup. Cook, stirring, over low heat until sugars dissolve. Set aside.

Punch down dough, then turn out to a floured surface. Divide dough into 3 equal pieces; roll each into a ball (refridgerate or freeze what you are not using).

Assemble buns: Roll out dough ball in a 10x13 rectangle. Brush dough with melted butter. Top with filling, leaving a 1/2 inch border. Starting on one long side, roll into a log. Pinch dough edge on the log. Cut into nine slices, approximately 1 1/4 inch thick.

Divide 1 cup of topping into the nine cups of a large muffin tin (1 cup capacity) or cover the bottom of a 8 inch square baking pan. Place the buns in the tin or pan.

Preheat oven to 375 degrees with rack on the lower level. Let sticky buns rise in a warm place for about 30 minutes until doubled in size. Bake, rotating pan halfway through, until golden brown and bubbling, 30-35 minutes. Immediately turn out buns onto rack. Serve warm.

Thursday, August 26, 2010

Baby's Stock

This is such a great recipe to make for your little one because you can use it alone or as an ingredient in so many other baby recipes (to follow!). The veggies can really be your choice, just be sure that at least 2 out of the 3 you pick, you've already introduced to your baby. Mix it up, you can add leek, or squash and even add some tasty herbs like basil or chives. Your baby may even like this in a bottle as a substitute for water, and get all the nutrients from the veggies at the same time!

Makes about 2 cups

6 spears of asparagus
1/2 sweet potato, peeled and cut into chunks (1 cup)
1 zucchini (1 cup)

Put 4 cups of cold water in a medium pot. Add asparagus, sweet potato and zucchini and bring to a boil over high heat. Reduce heat to maintain a gentle simmer and cover pot. Simmer until vegetables are very soft and cooking liquid is light flavored and colored, about 1 hour.

Strain the broth, reserving veggies. Save them and puree for another tasty dinner! Serve stock lukewarm or cooled in a bottle or sippy cup or use in other recipes.

Baby's Oatmeal

I love having this in the fridge for Jules so she and daddy can have their oatmeal together in the morning...it's seriously the cutest. She loves to feed herself (we almost never use a baby spoon with her anymore!) and this is thick enough that she can grab chunks of it off of her high chair tray. I love introducing new spices and flavors to her, like the cinnamon and vanilla in this oatmeal.

Makes about 2 cups

Baby's Oatmeal

1 cup old fashioned rolled oats
1/2 tsp ground cinnamon
1 tsp vanilla extract

In a medium saucepan over high heat, combine 2 cups of water, cinnamon and vanilla and bring to a boil. Reduce heat to medium low and stir in oats.
When mixture begins to simmer, cover, turn off heat and let stand until thick and creamy, about 15 minutes. Serve with breast milk, formula or throw in some of your own add-ins. Jules loves mashed bananas in hers!

Saturday, August 14, 2010

Chocolate Cherry Cake

Ahhh...Chocolate Cherry Cake...the easiest, most delicious cake you will ever eat! You are basically jazzing up a cake mix from a box, although it will taste like it took you hours. This past birthday (because it's a staple on birthdays!), my sister was visiting and we made this cake. We devoured it in a weekend's time...ate it for breakfast, lunch and dinner! This cake is very moist and will stay for days in the fridge. A tip about the milk for the icing...I've used everything from skim milk to heavy cream depending on what I had in my fridge. They all work just fine, it will just depend on how thick you want your icing. Obviously, the thicker the milk or cream, the denser your icing!


Chocolate Cherry Cake

1 box of Chocolate Fudge cake mix
1 can cherry pie filling
1 tsp. almond extract
2 eggs, beaten

Combine the ingredients by hand and pour into a greased 13x9 pan. Bake at 350 degrees for 25-30 minutes or until a toothpick inserted into the middle of the cake comes out clean. Cool before adding icing.

Icing
1 cup sugar
1/2 cup milk or cream
5 tablepoons butter
1 cup semi-sweet chocolate chips

Mix first 3 ingredients together in a medium saucepan and bring to a boil for 1 minute, stirring constantly. Add chocolate chips, stir until melted. Pour over cooled cake.

Wednesday, August 4, 2010

Basic Pizza Dough

I love making my own pizza dough...not only is it super simple, but it's so good.  This will make two balls of dough, each one big enough for a pizza, calzone, stromboli...whatever your preference.  


There are so many recipes out there for pizza dough, but this one is by far the best that I've tried.  Just a few ingredients, about 10 minutes of your time (minus the waiting for the dough to rise) and you're good to go!  Also, I also use the fast rising yeast, one less thing you have to wait for (see notes if using regular yeast).  I've made some pretty fabulous pizzas and strombolis with this dough...those recipes to follow...

Makes 2 dough balls (about 1 pound each)

Basic Pizza Dough 

1 package of Fast Rising Yeast (or 2 1/4 teaspoons)*
1 1/4 cups warm water
3 1/4 cups bread flour (approximately - add more a couple of tablespoons at a time if dough is too sticky)
1 teaspoon salt
1 tablespoon sugar
1 tablespoon olive oil

In the bowl of a stand mixer fitted with the dough hook, combine the bread flour, yeast, salt and sugar.  Add water and olive oil and mix.  Continue mixing the dough with the dough hook until it completely pulls apart from the sides, about 5 minutes.  Lift the dough out, spray the bowl with non-stick cooking spray and place dough back in bowl, turning to coat the surface.  Cover with a tea towel and let rise in a warm place for 1 hour.

Divide the dough into 2 equal portions.  Place on cutting board or baking sheet and cover again with towel, let rest for 30 minutes.  If you are not going to use both, wrap one in plastic wrap and put in fridge for no more than 3 days.  If you want to freeze it, wrap in plastic wrap and place in a freezer bag.  Place in the fridge the night before you want to use it and let come to room temperature before using that day.

* If using regular (not fast rising) yeast, dissolve the packet into 1/4 cup of the warm water and add the tablespoon of sugar.  I do this right in the bowl I'm going to use to mix the dough.  Let sit for about 10 minutes until the mixture foams and doubles in volume.  Then add all of the remaining ingredients, mix and knead as directed above.

Black Plums for Baby

I've said this before, but plums are a favorite fruit of mine, so I pretty much always have them around. Jules really enjoyed this, too! After I steamed them, they really just fell apart enough for me to mash them up with a fork. And, if your babe is not ready for chunks, puree your cooked plums in your food processor.


Makes about 1 cup

Cut 2 plums into quarters and remove pit. Add about 1/2 inch of water to a medium saucepan and bring to a boil; add plums and tightly cover. Steam for about 5 minutes, until they are very tender and drain if necessary. The skins should peel right off, make sure to remove before pureeing or mashing with a fork.

Will keep in your fridge for 3-4 days or freezer for up to 3 months.

Wednesday, July 28, 2010

Mashed Zucchini

Jules loves just about anything you put in front of her, which has been great fun for us. At 4 or 5 months, we gave her zucchini as a puree, but now that she is 7 months, we've been introducing chunkier foods. If your little one is not ready for chunks, feel free to throw your steamed zucchini into your food processor. It is very runny and liquidy so no need to add breast milk or formula. You may actually want to add rice cereal or oatmeal to make it a little thicker.


Makes about 1/2 cup

Cut two zucchinis into 1 inch rounds. Bring about 1/2 inch of water to a boil in a medium saucepan and add the zucchini. Turn your heat down to medium and put the lid on tight. Let steam for 5-9 minutes until the zucchini is fork tender.

If the water has not evaporated, drain well and let the zucchini cool. Mash with a potato masher (or puree in your food processor). Keep in your fridge for 3-4 days or in your freezer for up to 3 months.

Sunday, July 18, 2010

Plum Oatmeal Crisp

Give me chocolate over a fruit dessert anyday. Well, except for the summer, when everything is beautiful and all the fruits and veggies are in season, it totally makes me crave a fruit crisp or cobbler. Plums are a favorite of mine and I just knew their tartness would go so well with the buttery oatmeal topping. Don't forget the ice cream...and be sure to put it on when the crisp is still warm!

Serves 6

1/2 cup plus 1 tablespoon flour
1 cup plus 2 tablespoons packed light brown sugar
1/2 cup old-fashion rolled oats (not quick cooking)
1/4 teaspoon salt
1/2 cup cold unsalted butter, cut into small pieces
2 pounds ripe plums (about 8), cut into 1 inch pieces

Preheat oven to 375 degrees. In a medium bowl, stir together 1/2 cup flour, 1 cup sugar, oats and salt. Using 2 knives, cut in butter until coarse crumbs form.

In a shallow 2 quart baking dish, toss plums with remaining sugar and flour; sprinkle with oat topping. Place dish on a rimmed baking sheet and bake until golden brown, 40-45 minutes.


Wednesday, May 26, 2010

The Best Brownies Ever

Seriously, they really are. The easiest, too! I've had requests for these at parties; I've watched one of my friends devour almost a whole pan himself. They are gooey and rich and just about perfect with an ice cold glass of milk.


Makes approximately 24 brownies

2 cups sugar
1 cup vegetable oil
4 eggs
6 tablespoons cocoa
1 teaspoon vanilla
1 1/2 cups self-rising flour

Preheat oven to 325 degrees. Combine sugar, oil, eggs, cocoa and vanilla and mix well with electric mixer. Add flour, mix well. Spread into a greased 13 x 9 inch pan. Bake for 25 to 30 minutes.

Monday, May 17, 2010

Peas for Your Sweet Pea

This was Jules' first green veggie - again, she could not get enough. She LOVES peas! She eats better than her mother! This puree takes just minutes and is so much prettier than the peas in the jar...it should be bright green, not drab in color. I used one 10 oz bag of frozen peas, which made this all the more easy for me!

Makes 1 1/2 cups

Bring approximately 1 inch of water to boil in a small pot. Put peas in the pot and bring back up to a boil. Cover and steam until bright green and tender, 5-7 minutes for frozen or 3 minutes for fresh. Drain and run under cold water to stop the cooking.

Puree peas in a food processor until smooth. Add breast milk or formula to the pea puree to a consistency that your baby can handle.

This will keep in the fridge for 3 days or in the freezer for up to 3 months. I split this and used 1/2 for those 3 days and froze the other half for another time.

Sweet Potato Puree

We were so excited to find out Jules was ready to start eating solid foods! I knew from the get-go that I was going to make her own baby food because I wanted her first tastes to be fresh, delicious and wholesome.  


Sweet potatoes were her first real food!  Our Jules...she kept grabbing the spoon and obviously could not get enough.  It is SO easy to make baby food at home.  Too easy not to do!   


Sweet Potato Puree

2 medium sweet potatoes, scrubbed
dash of cinnamon, optional

Preheat oven to 425 degrees.  Pierce the sweet potatoes with a small knife and place on a baking sheet. Roast until wrinkled and tender when pierced with a knife, 45-60 minutes. Cool.

Halve the sweet potatoes and scoop out insides.  Add to a food processor or Baby Bullet, with the cinnamon (if using) and puree until smooth. Add breast milk, formula or water to the consistency your baby can handle.

The puree will stay in the fridge for 3 days or in the freezer for up to 3 months.

Saturday, May 15, 2010

My Great Aunt Libby's Chocolate Cake

Or this is my attempt anyway! Before I go any further, you need to fully understand how amazing Aunt Libby's cake is. Whenever our family would get together, for any holiday or party, she would always make this cake and it was the only thing we could focus on! "Aunt Libby's cake is here..." you would hear in hushed whispers around the room and we all knew to snag a piece before it was gone. I called my mom to see if she had the recipe, although I was sure it was some sort of secret that wasn't even written down. Surprised, she had it but couldn't locate it! Ugh...so close! We put our heads together, and she filled me in on a few things, including a secret ingredient (almond extract!) and off I went to recreate. This is an incredible cake for those of you that have not had the pleasure of trying Aunt Libby's, and to me, comparably, I am pretty pleased with myself (and this cake!).


My Great Aunt Libby's Chocolate Cake

1/2 cup cocoa powder
1/2 cup boiling water
1/2 cup butter, room temperature
1 1/4 cups sugar
2 eggs
1 teaspoon almond extract
1 1/2 cups cake flour
1 teaspoon baking soda
1/4 teaspoon baking powder
1/4 teaspoon salt
1/2 cup sour cream

For the vanilla frosting:
3 cups confectioners sugar
1/2 cup butter, room temperature
1/2 cup milk 
1 teaspoon vanilla

Dissolve cocoa in water, let stand until cool. Preheat oven to 350 degrees. Cream butter and sugar until light and fluffy. Add eggs, one at a time, beating well after each. Add almond extract. Combine flour, baking soda, baking powder, and salt; add to creamed mixture alternately with sour cream, beating well. Add cocoa mixture, beat well.

Pour into a well greased 9 x 13-inch cake pan and bake for 25-28 minutes or until a toothpick inserted near the center comes out clean.  While it is cooling, make the frosting by combining all of the ingredients and mixing with a hand mixer.  Spread on completely cooled cake.

Friday, May 14, 2010

Snickerdoodles

I love sugar cookies and these Snickerdoodles are a cinnamony, drier crumb version of those. Typically I make Snickerdoodles around Christmas time, but there's no need to wait until the end of the year to enjoy these! Fantastic with coffee, they are soft on the outside and crumby, almost flaky on the inside. These are small, almost bite size so be sure to help yourself to a few (and maybe, if they're lucky, save some for your family)!


Makes 2 1/2 dozen

Snickerdoodles

1 2/3 cups all-purpose flour
1/2 teaspoon ground nutmeg
3/4 teaspoon baking powder
1/2 teaspoon salt
1/2 cup butter, room temperature
1/2 cup plus 2 tablespoons sugar
1 egg
1 teaspoon vanilla extract
1 tablespoon cinnamon

Preheat the oven to 350 degrees. Combine flour, nutmeg, baking powder and salt; set aside. In a large mixing bowl, cream the butter with 1/2 cup sugar until light and fluffy. Beat in the egg and vanilla. Add the dry ingredients and mix until well blended.
Spoon the remaining sugar and cinnamon onto a plate. 

With your fingers, squeeze out pieces of dough and roll between the palms of your hand into walnut-sized balls. Roll each ball in the cinnamon-sugar mixture and place on a greased baking sheet.

Bake for 15 minutes until golden brown. Let cool for 1 minute and then transfer to a wire rack to cool.

Tuesday, April 20, 2010

Angel Food Cake

So, apparently there is a specific baking pan to make Angel Food Cake! Who knew?? I'm guessing most people do know, and I'm sure it's kind of embarrassing that I was not aware of this. As I started to make this, I realized that my bundt pan was not the shape of how you typically picture an Angel Food Cake looking and I immediately kind of panicked...but I ran with it! And, it turned out great! The only thing is, that if you also do not have an Angel Food Cake pan and decide to do what I did, you can probably half this recipe...I ended up making 2 of these because the bundt pan is much smaller. Once the cake is taken out of the oven, make sure to invert it while cooling to keep the cake from falling in on itself. An orange glaze would be fantastic on this...simply combine 1 1/4 cup sifted confectioner's sugar, the grated zest of one orange, 2 tablespoons of orange juice and 1 teaspoon of lemon juice. Drizzle over top!

Makes 1 cake

1 cup cake flour (spooned and leveled)
1/4 teaspoon salt
12 large egg whites, room temperature
1 teaspoon cream of tarter
1 1/4 cups sugar
2 teaspoons vanilla extract

Preheat the oven to 350 degrees. Place flour and salt in a sieve over a bowl, sift into bowl and set aside. With a mixer, beat egg whites on medium-high until foamy, about 1 minute. Add cream of tarter; beat until soft peaks form. Continue to beat, gradually adding sugar; beat until stiff peaks form (about 2 minutes.

In four batches, using the sieve again, sift flour mixture over the egg-white mixture. While turning the bowl, use a rubber spatula to fold the mixture by cutting down the center and coming up the sides.

Gently spoon the batter into an ungreased angel food cake pan and smooth top. Cut a knife through the batter to release air bubbles. Bake until cake is golden and springs back to the touch, 35 minutes. Invert pan, let cool for 1 hour. Run a knife around the inside of the pan and around the center to release cake and unmold.

Friday, March 26, 2010

Check it out! I'm on CafeMom!

I was featured on CafeMom for The Art of Comfort Baking! This article can be found on The Stir, a CafeMom blog, which keeps mom up to date on the latest beauty tips, health advice, entertainment news and so much more!


Brooke Griffin of the Art of Comfort Baking: What's In My Fridge
Posted by Brianne DiSylvester on March 26, 2010 at 12:00 PM

Every Friday in our "What's In My Fridge" feature, we'll be chatting with a different food blogger, asking them about their favorite foods and kitchen tools.

This week, I interviewed new mommy and baker Brooke Griffin from The Art of Comfort Baking. She lives in Savannah, GA, has a 3-month-old daughter, Julianna Rose, is a mark. makeup rep by day, and baker at heart. Find out what she can't wait to feed her daughter and which dessert is so good she hides it from her hubby.

What's in your fridge?
In order to not waste food, I always decide what I'm going to make and shop for just the week. Otherwise, I throw too much out because I forget what I bought! Right now, I have corn tortillas and lots of shredded cheese to make enchiladas. Also, we love to grill (it's finally getting warm out!), so one night I know we will make barbecue chicken and asparagus on the grill. Yum! Other than that, I HAVE to have all the necessities needed to bake -- like eggs and lots and lots of butter.

Tell us about The Art of Comfort Baking and what inspires you.
I started my blog, the Art of Comfort Baking when my beautiful daughter, Julianna, was born and I became a stay at home mom. Comfort baking for me is all about taking pleasure in the entire process and having fun in the kitchen; then sharing the outcome ... it's a win-win! Everyone's happy!


If you could only eat one sweet treat for the rest of your life, what would it be?
Chocolate Cherry Cake. It's hardly gourmet -- made with cake mix from the box and a can of cherry pie filling! But, it's the best! My sister and I once devoured one in two days; we ate it for breakfast, lunch, and dinner!


You're a new mom: What can't you wait for your baby to try for the first time?
This is actually a really important topic to me ... Jules will definitely be getting homemade baby food. I want her first foods to be wholesome AND delicious! So, I'm really just excited for her to try foods that I will make for her. I will probably start out with fruits and veggies, such as apples, bananas, and peas.


What's your favorite baking tool?
Easy! My Kitchen Aid mixer! I could not live without it. I bake so much that having a hands free mixer is the only way to go.


Chocolate or fruit desserts?
No contest, chocolate all the way. All I can say is that it's in my blood ... my mom always has chocolate on hand!


What dessert is so good you hide it from your hubby and don't share?
When I make chocolate chip cookies I have to hide some of them or they will be gone in like a day. I personally witnessed my husband eat almost the entire tray right as they came out of the oven once!


Be sure to check out more on The Stir at CafeMom!

Thursday, March 25, 2010

Cheesy Jalapeno Corn Muffins

When I think of baking, I immediately go to something sweet, as do most people. Tonight I thought, why not savory? I love cornbread and sure do get my fill living in the south. The combination of the sweet cornmeal and honey mixed with the heat of the jalapenos gives these such an amazing taste, with a real good bite (said with my best southern accent)!! Sprinkle a little cheese on top a couple of minutes before they are done and you get a cheesy, golden brown top that is too yummy! By the way, I used a Mexican blend of shredded cheese, but colby jack or even cheddar would be great - your pick.

Makes 24
1 cup flour
1 cup yellow cornmeal
3/4 teaspoon salt
1 tablespoon baking poweder
1/4 teaspoon cayenne pepper
1/3 cup shredded cheese, plus more for sprinkling
1 cup milk
1/4 cup vegetable oil
2 eggs, lightly beaten
1/2 of a 4 oz. can of diced jalapenos
3 tablespoons honey
1 cup frozen corn, thawed

Preheat oven to 375 degrees. Lightly grease a 12 cup muffin tin. In a large bowl, stir together the flour, cornmeal, baking powder, salt, cayenne pepper and cheese. Whisk together the milk, oil, eggs, jalapenos and honey. Add the milk mixture to the flour mixture, stiring until combined.

Spoon the batter into the tins, filling 3/4 of the way full. Bake for 1o minutes and sprinkle with shredded cheese. Continue baking until golden brown, another 2-5 minutes. Transfer to a wire rack to cool and serve warm.

Wednesday, March 3, 2010

Chocolate Truffle Cakes

These individual cakes are a take on the molten chocolate cakes...instead of the chocolate oozing out when you break into it, these wonderful goodies contain a truffle center, soft and rich and oh so scrumptious! The outside is brownie like in texture and make these so rich that you may have to share one (or in my case, no way!). For extra fudgy cakes make them a day ahead; wrap in plastic wrap and refrigerate. Great chilled or at room temperature!

Makes 6 cakes

5 tablespoons unsalted butter, plus more for muffin tin
1 tablespoon flour, plus more for dusting
14 ounces semi-sweet chocolate chips
2 tablespoons sugar
2 large eggs
1/4 teaspoon salt

Preheat the oven to 375 degrees. Generously butter a standard 6-cup muffin tin. Dust with flour, taping out the excess and set aside.

Place chocolate, butter and 1 tablespoon sugar in a medium heat-proof bowl set over a pan of simmering water; whisk occasionally until smooth. Remove from heat and let stand until cool and thickened, 3 to 5 minutes. Process eggs and remaining tablespoon sugar in a food processor until pale and doubled in volume, about 2 minutes. Sift flour and salt into egg mixture, pulse to combine. Add chocolate mixture 1/4 cup at a time, pulse each addition until combined (batter will be thick).

Spoon mixture into the prepared muffin tin, filling cup 3/4 full. Bake until tops are springy to the touch, 18 to 20 minutes. Immediately turn out onto wire racks, reinvent, and let cool. Dust with powdered sugar.

Wednesday, February 24, 2010

Coconut Sandwich Cookies

You wouldn't know it from my blog so far, but chocolate is my life! I have to have something chocolately every day, I just do. However, since starting this blog, I've been really trying to think outside my usual desserts, such as brownies or chocolate chip cookies (which, yes, of course I've already written about!). I asked my husband last night if he liked coconut because I wanted to make these...well, his expression told me everything (the sour face and scrunched up nose definitely told me no)! I say this because he LOVED these and could not get enough of them. So, even if your loved ones do not like coconut, I guarantee they will like these. Just don't roll them in the extra coconut, or do half with and half without. They are the most buttery cookies and the filling is to die for!

Makes 30

2 cups all-purpose flour
1/2 teaspoon baking powder
1/2 teaspoon salt
1 package (7 ounces) sweetened shredded coconut
3/4 cup (1 1/2 sticks) unsalted butter, room temperature
1/2 cup sugar
1/2 cup packed light brown sugar
1 large egg
1 teaspoon vanilla extract
Creamy Vanilla Filling (see below)

Preheat oven to 350 degrees. Whisk together flour, baking powder and salt; set aside. Place 1/2 cup shredded coconut in a small bowl and set aside. Place remaining coconut in a food processor and pulse until coarsely ground.

Using an electric mixer, beat butter and sugars until light and fluffy. Beat in egg and vanilla. With mixer on low, gradually add flour mixture and ground coconut until combined. Using a small ice cream scoop (approximately 1 tablespoon), drop dough onto two baking sheets. Bake until lightly golden around the edges, 10 to 12 minutes. Transfer cookies to a wire rack to cool completely.

Dividing evenly, spread filling on flat side of half the cookies; sandwich with remaining cookies. Roll edges in reserved coconut and chill until ready to serve.

Creamy Vanilla Filling
Makes 1 Cup

Using an electric mixer, beat 1/2 cup (1 stick) room-temperature butter until light and fluffy. Beat in 1 cup confectioner's sugar, 1/2 cup at a time. Add 1/2 teaspoon vanilla extract and increase speed to high. Beat until filling is light and fluffy, 5 minutes.

Thursday, February 18, 2010

Banana Bread

I always have the best of intentions when I buy fruit, but more than half the time I feel like I throw out more than I eat. It just seems to go bad so quickly! Bananas are the worst, I swear just a couple of days and they are already black. Here is my tasty solution to those too ripe to eat bananas...in fact, the riper, the better! This basic recipe is also fantastic with 1/2 cup of chocolate chips, walnuts or pecans. Just add them in at the very end right before pouring into the loaf pan.

Makes 1 loaf

Banana Bread

1/2 cup vegetable oil
1 cup sugar
2 cups all-purpose flour
1 teaspoon salt
2 teaspoons baking powder
1/2 teaspoon baking soda
3 bananas, mashed
1/3 cup buttermilk *

Preheat oven to 350 degrees. Using an electric mixer, combine the oil and sugar. Sift together flour, salt, baking powder and baking soda and add to sugar mixture. Add remaining ingredients; mix well. Pour into a well-greased loaf pan and bake for 40-45 minutes.

*No buttermilk? Add 1 teaspoon distilled white vinegar to 1 cup milk; let sour for 5 minutes.

(Source:  Adapted from Paula Deen

Monday, February 15, 2010

Crispy Chocolate Chip Cookies

Chocolate chip cookies are by far my favorite cookie. That being the case, I always have the ingredients on hand to make them. The recipe for chocolate chip cookies is simple and rarely will you find one that differs from another (you can find it on the back of EVERY brand of chocolate chips)...unless you are adding walnuts, oats, etc. 


I started toying around with the recipe to see if I could get a crispier on the outside, still gooey in the middle type of cookie. And, this is it! The dough is thicker than it typically is, so it's kind of hard work stirring in the chips at the end, but so worth it.  

Makes 3 Dozen

Crispy Chocolate Chip Cookies

2 cups all-purpose flour
1 teaspoon baking soda
1 teaspoon salt
1 cup room temperature butter
3/4 cup sugar
3/4 packed brown sugar
1 egg
1 teaspoon vanilla extract
2 cups semi sweet chocolate chips

Preheat oven to 350 degrees. Sift flour, baking soda and salt together, set aside.

Using an electric mixer, cream together the butter and sugars until light and fluffy. Beat in the egg, then add the vanilla. Mix in the dry ingredients until well blended, then stir in the chocolate chips. Using a small cookie scoop (approximately 2 tablespoons) drop the dough onto an ungreased cookie sheet.

Bake for 14-15 minutes. Allow the cookies to cool a few minutes before transferring to wire rack to cool completely.

Tuesday, February 9, 2010

Pumpkin Cupcakes with Cream Cheese Icing

These were a creation based on "let's clean out the pantry" last night, where I found a can of pumpkin puree that I just couldn't let go to waste. As soon as it starts to feel like fall, I immediately get obsessed with anything pumpkin...pumpkin pie, pumpkin roll, pumpkin chocolate chip cookies, you get the picture. Fall is over and we are now well into winter (even though today in Savannah it's about 65 degrees!) but these will do just fine to satisfy my and my husband's sweet tooth. Enjoy!


Makes 12

Pumpkin Cupcakes with Cream Cheese Icing

1 stick unsalted butter, melted, 
1 cup packed light brown sugar
2 large eggs, room temperature, lightly beaten
1 cup canned pure pumpkin puree
1 tablespoon pumpkin pie spice
1 1/2 teaspoons pure vanilla extract
1 teaspoon baking powder
1 teaspoon baking soda
3/4 teaspoon plus 2 pinches salt
1 2/3 cups flour

For the icing
1/2 stick butter, room temperature
4 ounces cream cheese
1 cup confectioner's sugar

Preheat the oven to 350 degrees. Spray a 12-cup muffin pan with non-stick spray.

In a large bowl, whisk together the melted butter and brown sugar until smooth. Whisk in the eggs, pumpkin puree, pumpkin pie spice, 1 teaspoon vanilla, baking powder, baking soda and 3/4 teaspoon salt until combined. Fold in the flour.

Using an ice cream scoop, drop generous mounds into the muffin pan cups. Bake for 20 minutes or until springy to the touch. Let cool completely.

Using an electric mixer, cream the softened butter with the cream cheese. Add the confectioner's sugar and remaining 2 pinches of salt and 1/2 teaspoon vanilla. Mix on low until blended, then beat on medium-high speed until fluffy, about 2 minutes.

Spread the cooled cupcakes with the icing and dust with pumpkin pie spice.